How The Plan Works
An eCommerce or Agency Plan will help you organize your marketplace product image files. While the eCommerce and Agency Plans both offer the same feature set, the Agency Plan provides more storage space and account users.
BucketLynx can automate adding product image file links to your eCommerce marketplace bulk product upload template files. The auto-populate feature can save you time and money as it reduces the costly overhead of manually editing bulk upload templates.
BucketLynx supports bulk upload template formats for the following major marketplace providers. Click on a marketplace logo to see the steps required to populate that marketplace upload template file.


To use BucketLynx:
- Create a bucket
- Upload your product image files by selecting or dragging them into the bucket
- Click on a file to get a preview along with a link to the file
- Click on the "Create Link File" button to download an Excel file containing the links for all files in the bucket
To use the automatic template population feature:
- Upload your marketplace formatted CSV or Excel spreadsheet bulk upload template file*
- If populating Amazon product template files, make sure you upload your product image file to the correct Amazon sub-folder that corresponds to the Amazon image type (i.e., select the "main" sub-folder to upload main image files) and then drag the file into the bucket sub-folder
- If populating Amazon Custom Text or template files for any other supported eCommerce marketplace, upload your preview image and custom font files to the bucket
- Find your bulk upload template file and press the populate button () next to your template file to get image file links automatically added to your template file
- Press the download button to download your populated template file
- Submit your populated template file to you marketplace account for processing
Refer to the marketplace sections below for additional details on what each marketplace requires when populating bulk upload template files.
*While XLSX formatted files are recommended, you can also upload CSV or XLSM files.
Macros may be removed or fail to function properly for populated XLSM files and you may be presented with warnings when Excel attempts to read the XLSM file after it has been download from BucketLynx.
Naming Product Image and Template Files
Valid characters that may be used in your file names include A-Z, a-z, 0-9, underlines, dashes, plus signs, open parenthesis, close parenthesis and periods. If you are planning on using the automated template population feature, BucketLynx uses the product identifying SKU or product number column in your template file to find and relate image files to your products. The specific marketplace sections below contain additional product image file naming requirements.
Your product template files can be named anything provided they contain a recognized Excel or csv file extension and contain the required marketplace headers.
File Size Requirements
The following file sizes and recommendations should be followed when creating your product image files. Note that your target marketplace may impose additional product image requirements such as background color and other image quality rules.
- The largest uploaded file size allowed by BucketLynx is 50mb.
- Adobe Commerce (Magento) recommends base product image files be no more than 1200 pixels high.
- Amazon recommends product image files be at least 2560 pixels on the longest side.
- Alibaba recommends product image files be square and between 330 and 5000 pixels in size, and no larger that 5mb.
- BigCommerce recommends product image files be at least 1280 pixels on the longest side.
- eBay recommends product image files be at least 1600 pixels on the longest side.
- Ecwid and Zyro recommends product image files be at least 1000 x 1000 pixels.
- Facebook recommends product image files be at least 1080 x 1080 pixels.
- Poshmark requires product image files to always be square.
- Shopify recommends product image files be at least 2048 pixels on the longest side.
- ShopWired image file sizes are theme-dependent.
- SquareSpace recommends product image files be at least 1500 pixels on the longest side.
- TikTok recommends product image files be square and between 330 and 5000 pixels in size, and no larger that 5mb.
- Walmart recommends product image files be at least 600 pixels wide by 800 pixels high.
- Wayfair requires that product image files must be square and recommends that they are at least 2000 pixels wide and 2000 pixels high.
- Wix recommends product image files be at least 3000 x 3000 pixels.
- WooCommerce does not have specific product image size requirements since WooCommerce uses the WordPress image handler.
Your file space usage includes the space required to store your original files plus a smaller 160 pixel high thumbnail copy for image files.
Uploading Files
BucketLynx supports two methods for uploading files:
- You can or drag-and-drop or select files from your local machine to upload into a bucket, or;
- You can upload files from a remote server using a spreadsheet that contains links
To upload your files from your local machine:
- Select the bucket (or Amazon sub-folder) where you want to upload your product image files
- Press the "Upload Files" button and a Drag-and-Drop box will be opened
- Drag your files into the Drag-and-Drop box and they will be uploaded to your bucket
- You may also select product image files by name
To upload files from remote servers using a URL upload spreadsheet:
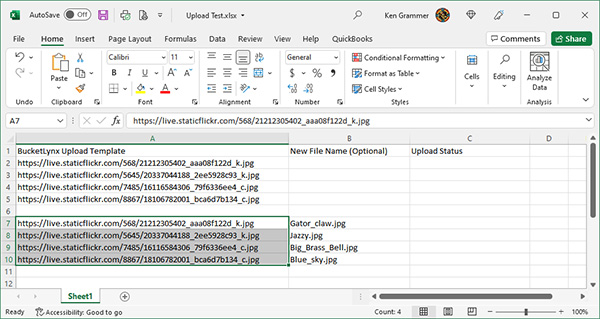
- Click here or on the spreadsheet image below to download a sample URL upload file with three test remote files
- It is important to keep the first row and column labels since that is used to define the spreadsheet as a BucketLynx Upload Template file
- The first column of the remaining rows contain the full URL link for each file to be uploaded
- Note that URL links that start with "http" many not work so we recommend always using "https" in your URL links
- If you want to give the file a new file name, put the new file name in column B or leave column B blank to keep the original name
- Save and upload the spreadsheet to your bucket
- Once added to your bucket you will see a button titled "Upload" either under the file information (for block mode) or to the right of the file name (for list mode)
- Press the "Upload" button and the files you added to the spreadsheet will be added to the bucket
- An activity bar will be displayed while your files are uploaded
- When the upload is finished, download the spreadsheet and review the "Upload Status" column for the transfer status of each file
- Files marked "OK" in the column B will be skipped, allowing you to safely restart the upload if it is interrupted
- If you need to re-upload any files, you can clear their entry and column B, reupload the spreadsheet and restart the upload
The files that you've uploaded by either method will be displayed when you press the "OK" button on the upload completed message box.
 Populating Adobe Commerce (Magento) Product Template Files
When populating Adobe Commerce (Magento) product upload template files, name and upload your product image files using the SKU number you put in the "sku" column of your template file. For example, if "sku" contains the SKU number "123456", you will need to upload three product image files for base, small and thumbnail images like "123456_base.jpg", "123456_small.jpg" and "123456_thumb.jpg". When you populate the template file, BucketLynx will find the the files that begin with "123456" and populate the "base_image", "small_image" and "thumbnail_image" columns of the template file with a link to each file.
If you want additional image files for a sku, include the "additional_images" column in your template file. Then upload your additional image files as "123456_add_1.jpg", "123456_add_2.jpg", "123456_add_3.jpg" and so on. BucketLynx will add links for your additional files in the "additional_images" column separated by commas as required by Adobe.
You can create a bucket just for your template files and separate buckets for categories of product image files. When you populate your template file, BucketLynx will search all of your buckets.
Adobe recommends that you use a program that supports UTF-8 encoding to edit CSV files, such as Notepad++ or OpenOffice Calc. Microsoft Excel inserts additional characters into the column header of the CSV file which can prevent the data from being imported properly into Adobe Commerce.
Once you have uploaded all of your product image files and your product template files, find the product template file and press the Populate () button. A green populate button indicates that the file has been populated. You can download the populated template file by pressing the download button.
 Populating Amazon Product Template Files
If you sell products through the Amazon marketplace and you are a eCommerce or Agency plan user, when you create a bucket for your files you must click the checkbox to have BucketLynx create your Amazon sub-folders. These Amazon sub-folders are used to organize product image files and relate them to specific columns in the Amazon marketplace product template files. These Amazon Product sub-folder names are matched to the column names in your Amazon Product template files as shown in the following chart:
For example, if you are selling hardware through the Amazon marketplace and you have a template file for modern door knobs that you have named "modern_door_knobs.xlsx", you might name your bucket for this template file "Modern Door Knobs". The bucket name does not have to match the template file name and you can have multiple template files in a bucket, but we'll keep things simple in this example.
When you create the "Modern Door Knobs" bucket, you will see a check box asking if you want to create Amazon Product image sub-folders. Checking this box and pressing "OK" will get the "Modern Door Knobs" bucket created along with the Amazon image sub-folders. Your Amazon product image files should be uploaded into the appropriate product image sub-folders if you plan on having BucketLynx populate your Amazon product template files.
Only Amazon uses these sub-folders so checking the option and creating the Amazon sub-folders is not required if you are creating buckets for other marketplace template files.
If you are populating an Amazon Product template file and you upload the image file "123456_main.png" to your "main" image sub-folder, when you populate the template file it will populate the link to that file in the main_image_url column in your template file. Likewise, if you have a file named "123456_left.png" in the "other1" image sub-folder, BucketLynx will populate the link to that file in the other1_image_url column in your template file. This is repeated for each image file found in the remaining sub-folders.
Sub-folders are only used with Amazon-specific product listing buckets.
If you are populating an Amazon Custom Text template file, you need do the following:
- Create a bucket to contain your custom text fonts. This will be a simple bucket since the Amazon sub-folders are not used.
- Upload your preview image files and name them using the associated SKU for your product line. For example, if your product sku column contain “123456-large”, you would upload your preview image as something like “123456-large.jpg”.
- Upload the font files you will be using.
- Edit your custom text template file and put the file name of the font file you want associated with each of the 1 through 15 Custom Font links in the “custom_font_urlx” column. For example, if you want to use the Roboto Regular font as the first custom font, put “Roboto-Regular” or “Roboto-Regular.ttf” in the “custom_font_url1” column. Continue this for any additional custom fonts you want to use.
- Upload your custom text template file to your bucket.
Once you have uploaded all of your product image files and your product template files, find the product template file and press the Populate () button. A green populate button indicates that the file has been populated. You can download the populated template file by pressing the download button.
 Populating Alibaba Product Template Files
Alibaba supports up to eight image files per product. When populating Alibaba product template files, name and upload your product image files using the SKU number you put in the "SellerSku" column of your template file. For example, if "SellerSku" contains the SKU number "123456", and you have three product files you want to include for the product, simply name and upload your product files and concatenate "_1", "_2" and "_3" in the file name (i.e. "123456_1.jpg", "123456_2.jpg" and "123456_3.jpg") to assign each image to it's designated image column. When you populate the template file, BucketLynx will find all of the files that contain "123456" and place them in the correct product image column. "123456_1.jpg" will be placed in "Product Images1", "123456_2.jpg" will be placed in "Product Images2" and "123456_3.jpg" will be placed in "Product Images3". This method will be repeated for all eight product image columns in the spreadsheet if they are present.
You can create a bucket just for your template files and separate buckets for categories of product image files. When you populate your template file, BucketLynx will search all of your buckets.
Once you have uploaded all of your product image files and your product template files, find the product template file and press the Populate () button. A green populate button indicates that the file has been populated. You can download the populated template file by pressing the download button.
 Populating BigCommerce Product Template Files
When populating BigCommerce product template files, name and upload your product image files using the SKU number you put in the "Product Code/SKU" column of your template file. For example, if "Product Code/SKU" contains the SKU number "123456", and you have three product files you want to include for the product, simply name and upload your product files something like "123456_1.jpg", "123456_2.jpg" and "123456_3.jpg". When you populate the template file, BucketLynx will find all of the files that contain "123456" in their name and populate the corresponding "Product Image File - 1", "Product Image File - 2" and "Product Image File - 3" columns with the link of your image files.
You can create a bucket just for your template files and separate buckets for categories of product image files. When you populate your template file, BucketLynx will search all of your buckets.
Once you have uploaded all of your product image files and your product template files, find the product template file and press the Populate () button. A green populate button indicates that the file has been populated. You can download the populated template file by pressing the download button.
 Populating eBay Product Template Files
When populating eBay File Exchange template files, name and upload your product image files using the SKU number you put in the "CustomLabel" column of your template file. For example, if "CustomLabel" contains the SKU number "123456", and you have three product files you want to include for the product, simply name and upload your product files something like "123456_1.jpg", "123456_2.jpg" and "123456_3.jpg". When you populate the template file, BucketLynx will find all of the files that contain "123456" in their name and concatenate their links with the eBay required "|" separator and place that string in the "PicURL" column of the template file.
You can create a bucket just for your template files and separate buckets for categories of product image files. When you populate your template file, BucketLynx will search all of your buckets.
Once you have uploaded all of your product image files and your product template files, find the product template file and press the Populate () button. A green populate button indicates that the file has been populated. You can download the populated template file by pressing the download button.
 Populating Ecwid Product Template Files
When populating Ecwid bulk upload template files, name and upload your product image files using the SKU number you put in the "sku" column of your template file. For example, if "sku" contains the SKU number "123456", name and upload your product file "123456.jpg". When you populate the template file, BucketLynx will find the file that contains "123456" and populate the "image" column of the template file.
You can create a bucket just for your template files and separate buckets for categories of product image files. When you populate your template file, BucketLynx will search all of your buckets.
Once you have uploaded all of your product image files and your product template files, find the product template file and press the Populate () button. A green populate button indicates that the file has been populated. You can download the populated template file by pressing the download button.
 Populating Facebook Marketplace Product Template Files
When populating Facebook Marketplace bulk upload template files, name and upload your product image files using the SKU number you put in the "id" column of your template file. For example, if "id" contains the SKU number "123456", simply name and upload your product file as "123456.jpg". When you populate the template file, BucketLynx will find the image that contains "123456" and populate the "image_link" column of the template file with the link to that image file.
You can create a bucket just for your template files and separate buckets for categories of product image files. When you populate your template file, BucketLynx will search all of your buckets.
Once you have uploaded all of your product image files and your product template files, find the product template file and press the Populate () button. A green populate button indicates that the file has been populated. You can download the populated template file by pressing the download button.
 Populating Google My Business Template Files
Google My Business bulk upload template files contain three image columns. These are "Logo photo", "Cover photo" and "Other photos". Each line in the template file starts with a "Store code" number, so the image files are associated using that store code. When populating Google My Business bulk upload template files, name and upload your business image files using the code you put in the "Store code" column of your template file.
For example, if "Store Code" contains "1", simply name and upload your logo image file as "1_logo.jpg". Your cover image would be named "1_cover.jpg". And you can name any other image files you want to use with the business as "1_other_front.jpg", "1_other_pic1.jpg" and "1_other_pic2.jpg". When you populate the template file, BucketLynx will find the image that contains the store code and populate the appropriate image columns with your image links.
Once you have uploaded all of your business image files and your Google My Business template file, find the template file and press the Populate () button. A green populate button indicates that the file has been populated. You can download the populated template file by pressing the download button.
 Populating Poshmark Template Files
When populating Poshmark product template files, name and upload your product image files using the SKU number you put in the "SKU" column of your template file. For example, if "SKU" contains the SKU number "123456", and you have a primary file and three alternate product files you want to include for the product, simply name and upload your primary image file "123456-CS.jpg" and name your alternate product files something like "123456-1.jpg", "123456-2.jpg" and "123456-3.jpg". When you populate the template file, BucketLynx will first find the primary file that has "-CS" in the name, and use the link to that file to populate the "Primary Image" column. BucketLynx will then find all of the files that contain "123456-X" in their name and populate the corresponding "Alt Image X" columns. For example, the link for "123456-1.jpg" will be placed in the "Alt Image 1" column, "123456-2.jpg" will be placed in the "Alt Image 2" column and so on.
You can create a bucket just for your template files and separate buckets for categories of product image files. When you populate your template file, BucketLynx will search all of your buckets.
Once you have uploaded all of your product image files and your product template files, find the product template file and press the Populate () button. A green populate button indicates that the file has been populated. You can download the populated template file by pressing the download button.
 Populating Shopify Product Template Files
When populating Shopify bulk upload template files, name and upload your product image files using the SKU number you put in the "Variant SKU" column of your template file. For example, if "Variant SKU" contains the SKU number "123456", simply name and upload your product file something like "123456.jpg". When you populate the template file, BucketLynx will find the file that contains "123456" and populate the "Image Src" column of the template file with a link to that file.
If your Shopify bulk upload template file will contain product variants, name and upload your product image files using the SKU number you put in the "Variant SKU" column of your template file. For example, if you have three variants for a product, your template file will contain three rows together with the same "Variant SKU" SKU number. Again, assuming the product SKU number is "123456", your template file will contain three rows that all have the same "123456" SKU number. You will then upload your product files by appending a sequential number to the file name like "123456_1.jpg", "123456_2.jpg" and "123456_3.jpg". When you populate the template file, BucketLynx will find all of the files that contain "123456" in their name and populate the "Image Src" column of the template file in order. "123456_1.jpg" will be placed in the first variant row. "123456_2.jpg" will be placed in the second variant row. And "123456_3.jpg" will be placed in the third variant row.
You can create a bucket just for your template files and separate buckets for categories of product image files. When you populate your template file, BucketLynx will search all of your buckets.
Once you have uploaded all of your product image files and your product template files, find the product template file and press the Populate () button. A green populate button indicates that the file has been populated. You can download the populated template file by pressing the download button.
 Populating ShopWired Product Template Files
When populating ShopWired product template files, name and upload your product image files using the Item ID number you put in the "Item ID" column of your template file. For example, if "Item ID" contains the number "123456", and you have three product files you want to include for the product, simply name and upload your product files something like "123456_1.jpg", "123456_2.jpg" and "123456_3.jpg". When you populate the template file, BucketLynx will find all of the files that contain "123456" in their name and populate the corresponding "Image URL/File Name 1", "Image URL/File Name 2" and "Image URL/File Name 3" columns with the link of your image files.
If the "Atl Tag" column associated with the image link that is being populated is empty, BucketLynx will add "Item xxxxxx product image y". "xxxxxx" will be replaced with the Item ID number and "y" will be replaced with the appropriate tag column number (1 through 5). This ensures that the alt tag columns have something in them since image alt tags are vital for proper SEO scoring.
You can create a bucket just for your template files and separate buckets for categories of product image files. When you populate your template file, BucketLynx will search all of your buckets.
Once you have uploaded all of your product image files and your product template files, find the product template file and press the Populate () button. A green populate button indicates that the file has been populated. You can download the populated template file by pressing the download button.
 Populating SquareSpace Product Template Files
When populating SquareSpace bulk upload template files, name and upload your product image files using the SKU number you put in the "SKU" column of your template file. For example, if "SKU" contains the SKU number "123456", and you have three product files you want to include for the product, simply name and upload your product files something like "123456_1.jpg", "123456_2.jpg" and "123456_3.jpg". When you populate the template file, BucketLynx will find all of the files that contain "123456" in their name and concatenate their links with the SquareSpace required line breaks and place that string in the "Hosted Image URLs" column of the template file.
You can create a bucket just for your template files and separate buckets for categories of product image files. When you populate your template file, BucketLynx will search all of your buckets.
Once you have uploaded all of your product image files and your product template files, find the product template file and press the Populate () button. A green populate button indicates that the file has been populated. You can download the populated template file by pressing the download button.
 Populating TikTok Product Template Files
TikTok supports up to ten image files per product. When populating TikTok product template files, name and upload your product image files using the SKU number you put in the "seller_sku" column of your template file. For example, if "seller_sku" contains the SKU number "123456", and you have three product files you want to include for the product, simply name and upload your product files and concatenate "_1", "_2" and "_3" in the file name (i.e. "123456_1.jpg", "123456_2.jpg" and "123456_3.jpg") to assign each image to it's designated image column. When you populate the template file, BucketLynx will find all of the files that contain "123456" and place them in the correct product image column. "123456_1.jpg" will be placed in "main_image", "123456_2.jpg" will be placed in "image_2" and "123456_3.jpg" will be placed in "image_3". This method will be repeated for the ten product image columns in the spreadsheet if they are present.
You can create a bucket just for your template files and separate buckets for categories of product image files. When you populate your template file, BucketLynx will search all of your buckets.
Once you have uploaded all of your product image files and your product template files, find the product template file and press the Populate () button. A green populate button indicates that the file has been populated. You can download the populated template file by pressing the download button.
 Populating Volusion Image Upload Template Files
Volusion does not have a traditional bulk upload file where remote links are used. With Volusion, you upload all of your image files to their site and then upload a CSV file that associates each image with a specific product. Image files are provided without any specific link information.
BucketLynx can help you manage Volusion product image files by following these simple steps:
- The image file names must consist of the product code that the image belongs to and an image display order separated by an underscore character. For example, if product code "123456" has three images, you would upload the three product images as "123456-1.jpg", "123456-2.jpg" and "123456-3.jpg".
- Create a simple spreadsheet file contains one line with three columns labeled "ProductCode", "ImageName" and "ImageOrder".
- Upload the files and your empty product code CSV file to BucketLynx.
- Find the product code CSV file and press the Populate () button.
- Download the populated CSV file.
- Upload the populated CSV file and your product image files to Volusion following their instructions.
A green populate button indicates that the file has been populated. You can download the populated template file by pressing the download button.
 Populating Walmart Product Template Files
When populating Walmart bulk upload template files, name and upload your product image files using the SKU number you put in the "Variant SKU" column of your template file. For example, if "SKU" contains the SKU number "123456", simply name and upload your product files something like "123456.jpg". When you populate the template file, BucketLynx will find the file with "123456" and populate the "mainImageURL" column of the template file. If you have an image in the bucket that is prefixed with "S-", as in "S-123456.jpg", that image link will be used as the the secondary image in the "productSecondaryImageURL" column.
You can create a bucket just for your template files and separate buckets for categories of product image files. When you populate your template file, BucketLynx will search all of your buckets.
Once you have uploaded all of your product image files and your product template files, find the product template file and press the Populate () button. A green populate button indicates that the file has been populated. You can download the populated template file by pressing the download button.
 Populating Wayfair Product Template Files
When populating Wayfair bulk upload template files, name and upload your product image files using the Supplier Part number you put in the "Supplier Part Number" column of your template file. Wayfair allows three images per product, so you would append "_1", "_2" and "_3" to you product image files. For example, if "Supplier Part Number" contains the part number "123456", upload your three product files with the names "123456_1.jpg", "123456_2.jpg" and "123456_3.jpg". When you populate the template file, BucketLynx will find the files with "123456" in the file name and populate the "Image 1 File", "Image 2 File" and "Image 3 File" columns of the template file with the appropriate image link.
You can create a bucket just for your template files and separate buckets for categories of product image files. When you populate your template file, BucketLynx will search all of your buckets.
Note that currently only image file population is supported. Please contact support at help@bucketlynx.com if you would like to see document population added.
Once you have uploaded all of your product image files and your product template files, find the product template file and press the Populate () button. A green populate button indicates that the file has been populated. You can download the populated template file by pressing the download button.
 Populating Wix Product Template Files
When populating Wix bulk upload template files, name and upload your product image files using the SKU number you put in the "sku" column of your template file. For example, if "sku" contains the SKU number "123456", and you have three product files you want to include for the product, simply name and upload your product files something like "123456_1.jpg", "123456_2.jpg" and "123456_3.jpg". When you populate the template file, BucketLynx will find all of the files that contain "123456" in their name and populate the "productImageUrl" column of the template file.
You can create a bucket just for your template files and separate buckets for categories of product image files. When you populate your template file, BucketLynx will search all of your buckets.
Once you have uploaded all of your product image files and your product template files, find the product template file and press the Populate () button. A green populate button indicates that the file has been populated. You can download the populated template file by pressing the download button.
 Populating WooCommerce Product Template Files
When populating WooCommerce bulk upload template files, name and upload your product image files using the SKU number you put in the "sku" column of your template file. For example, if "SKU" contains the SKU number "123456", and you have three product files you want to include for the product, simply name and upload your product files something like "123456_1.jpg", "123456_2.jpg" and "123456_3.jpg". When you populate the template file, BucketLynx will find all of the files that contain "123456" in their name and concatenate their links with the SquareSpace required line breaks and place that string in the "images" column of the template file.
You can create a bucket just for your template files and separate buckets for categories of product image files. When you populate your template file, BucketLynx will search all of your buckets.
Once you have uploaded all of your product image files and your product template files, find the product template file and press the Populate () button. A green populate button indicates that the file has been populated. You can download the populated template file by pressing the download button.
 Populating Zyro (Ecwid) Product Template Files
Zyro uses the Ecwid eCommerce platform.
See the Ecwid section above for details on using the Ecwid product template files.

Support
Please Confirm